Friday, July 8, 2011

DIY Succulent Garden

You have probably seen your fair share of succulent or cactus gardens out there and they're probably called all sorts of things, but this is what I've dubbed my little project - A DIY Succulent Garden. I'm a bit addicted to a few things. Hen and Chick Succulents, Chalk board paint, Cinnamon Bear candies, and my daughters silly little secrets that I can never understand are a few chart toppers. I saw a cute little succulent garden at Lowes the other day that was way too much for me so I adapted, because that's what this girls gotta do. I live on a budget and I get so much joy from making something for dirt cheap that costs 10x that much at a store! Ha. I hope you can relate. Here's the low down for you. Enjoy and have a fantastic weekend!


DIY Succulent Garden LOW DOWN...
Sorry for this lame picture. Here's what I decided to make my little succulent garden in. A silver plated bowl that cost me a whopping $2 at a garage sale last weekend.

BEFORE
I lined the bowl with good plastic wrap, making sure the wrap draped over the edges a bit. In my mind this made sense because I didn't want water to get in under it at the edges and pool under the plastic.
 Here are the pretty succulents I picked up at Lowes to go in my garden. The cost was $3.50 for the big one and $2.50 for the 2 little ones. So $8.50 for these 3 plants, except that I had a $20 gift card to Lowes so it was free for me. Still about $10 cheaper than buying something already made and this is fun!
 The big one is a Silver Jade succulent, and the little ones are 2 different versions of Echeveria. I had the other succulents you see in the background in the finished project image.

AFTER
I wanted the Jade to be in the center for balance. This succulent will eventually get big enough that I can put her in her own pot. It reminds me of a piece of coral. By the way, coral is another item that should be on my "obsessed with" list. Once everything was planted I snipped off the excess plastic wrap, but let it stay just high enough that it would keep the water from dripping off the sides into the actual bowl.
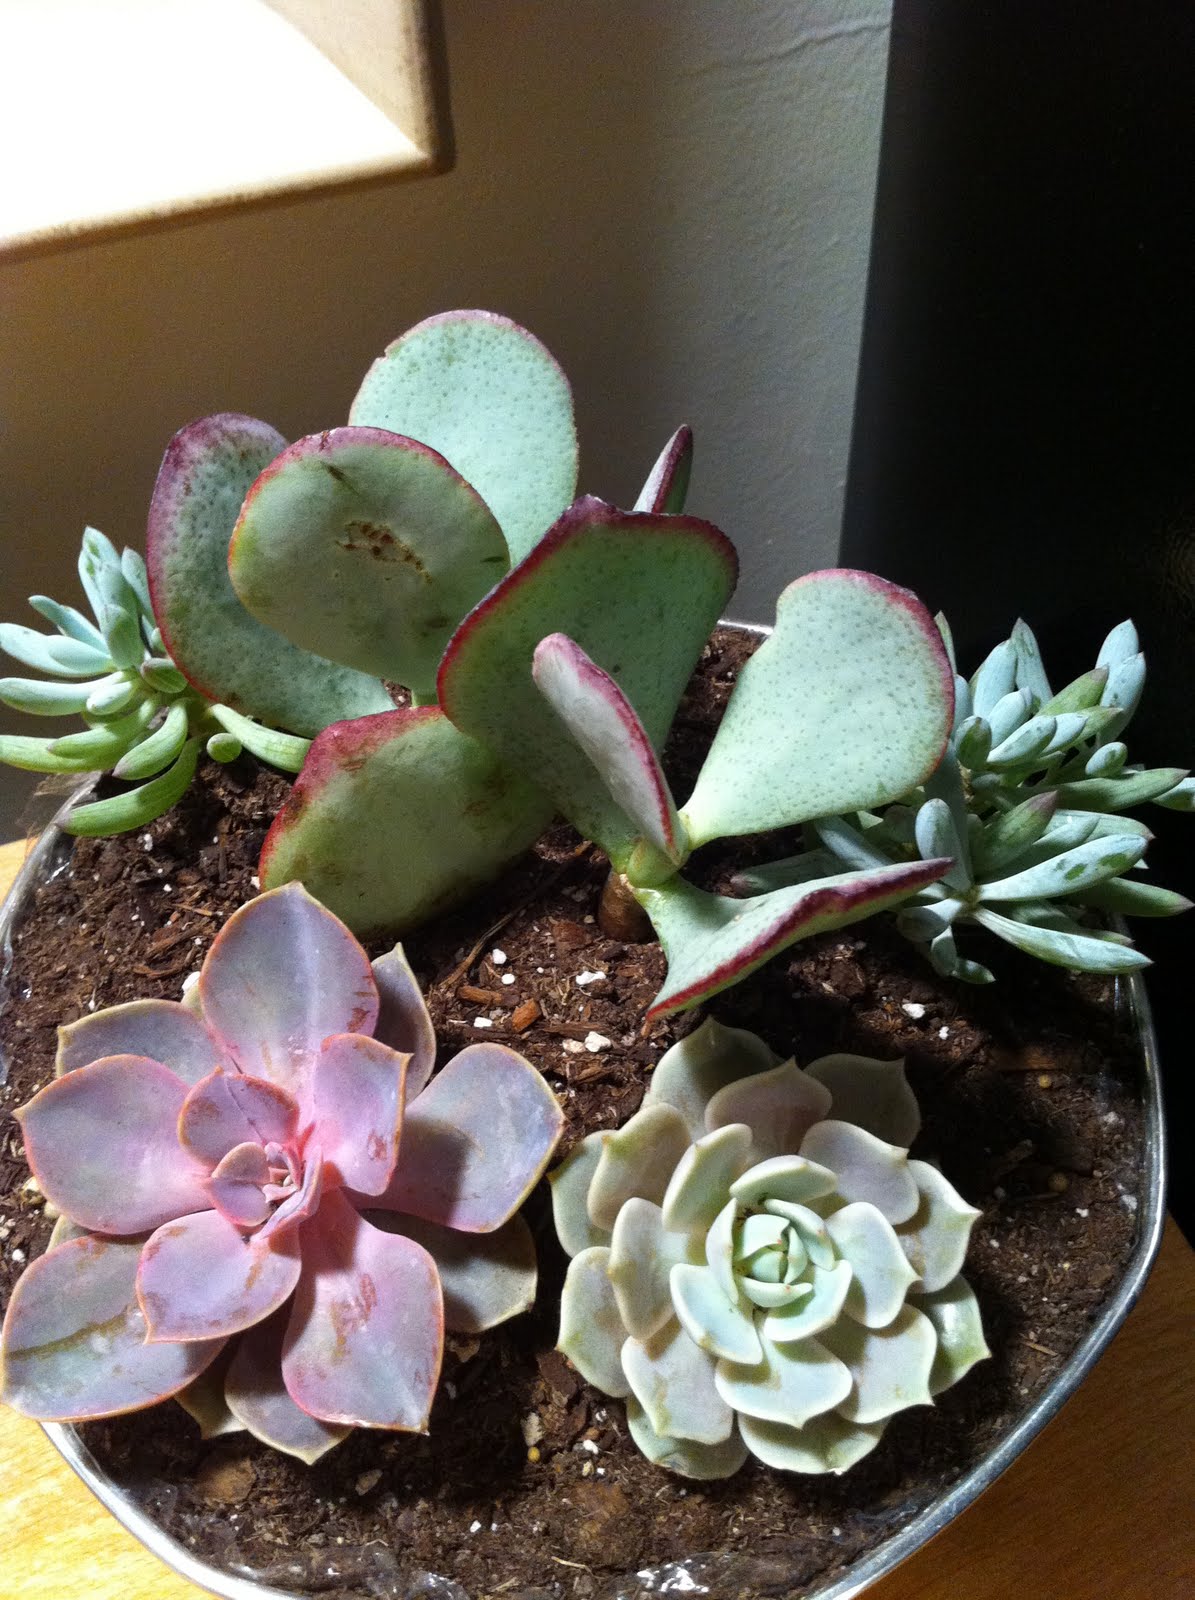
And there's the top view for you. I love the purple echeveria.
 This is where I'd love to keep my little succulent garden full time, but this baby needs sun so during the day I've had it sitting by my kitchen window.

Here are a few other succulents that you could use in your diy garden.
Image courtesy Etsy.com (the item had sold)

I hope you've enjoyed this. Do you think you'll tackle this project? What type of dish will you use?

Thursday, June 30, 2011

One More Recycled Love Letter Chalk Board

I'm a little crazy about chalk boards. Mostly because I love the always changing art that occurs around the house when you have them, and I love to inspire creativity in my daughter! She is always drawing, so I'm always swapping out the frames with new pictures she colored or painted. Chalk boards give her, and us, a chance to showcase her art without the work of changing out a picture in a frame. Now my 9 month old son can also play around with chalk and he loves it! He is getting pretty good at lines. If you need a vertical line drawn - he's your man!
So I've turned my love for chalk boards into a hobby and hopefully a business. If you like what you see here I've put up some similar pieces in my *SHOP* tab. It's just one more DIY project I wanted to share and hopefully inspire you with.
 
Recycled Love Letters Chalk Board LOW DOWN...
 
BEFORE
 
The 2'x3' piece I found at a garage sale for $7.00. There is no signature on the painting, but the lady told me her grandpa had a group of friends that always painted together and when he passed away she inherited the pieces left behind, all 300 of them! This was one of them. I didn't personally have any attachment to the piece because I'm not a dancer, but didn't want to ruin it.
AFTER

Here's how it all happened...
So I took off the backing and flipped the piece around so the art is now on the back just in case we ever want to flip it again one day. It was great to find out that the painting was actually done on fiberboard rather than canvas. This was going to be an easy DIY project!
 I primed the backside of the fiberboard to prep it for chalk paint. I used what I had - KILZ Latex primer. I rolled it on with a 9" sponge.
 My helper Peyton worked away on her piece of art too.
 Once I had 2 coats of chalk board paint on it was ready to put back in the frame. I like the frame as it was. Usually I paint them too. One day I probably will. I just can't help myself.

 Once it's in the fame I used 3/8th staples with my handy staple gun to keep the art in place.
 
A few more shots of it in all her glory...


The yellow vintage light above the chalk board and the succulents nestled into that vintage silver plated bowl  were other finds at the garage sale I went to last weekend.  I'll be posting about all those finds next. The Coral Serving tray was a clearance item at Target 2 years ago and the rolling cart was a salvage/painted piece. I just put two IKEA chopping boards on top to give it more useability. The magnetic knife stip is from IKEA too. Espresso machine was a great Craigslist deal. Starbucks barista for $70.
Next up got this little space - I'm going to put some sort of wall pattern back there (on the glossy white wall). I've gone stripe happy around this house so I want to do something different. Any ideas?

What do you think about this project?

Tuesday, June 21, 2011

Painting an Old Brass Chandelier White! (Did I Mention Electric Tape Was Involved?)

Some projects are inspired by beautiful images I see in magazines, or in a home, or online. Some projects just pop into my crazy mind - because I'm just always thinking about design and making something pretty out of something ugly. Then there are the other projects - the ones that are inspired by mishaps. The ones that blossom out of a bad situation. Ever have any of those? Like you damaged a wall, so while you're fixing it you might as well put stripes up...or something like that. That is TOTALLY this project. Our home has been in chaos the past 3 weeks because of electrical issues. We literally had to tear out 2 sections of our ceiling and the inside of a closet. It's almost all fixed now, but it was a costly project and made us all a little grumpy! Today I spray painted an old brass chandelier I had. It was free because it was the nasty thing hanging in the dining room when we bought our house. I have no love for brass. Sorry brass lovers. This chandelier is kind of just ugly because of its lines too. Anyway, the love starts here. I spray painted it white....
THE LOWDOWN

BEFORE
Brass and just wrong...
I put masking tape over the space where the light bulb goes and cleaned it all up with a damp rag.
 I decided that turning it upside down would be the easiest way to spray it first (less drips).
 The hubby and I picked an ivory white KRYLON Satin spray paint (Walmart for $3ish)
Apply about 6 thin coats, letting them dry for about 2 minutes between coats. Honestly, I can never let them dry that long. I basically spray, step away to examine and spray again. I like to get a nice even first coat all at once and I'm so impatient!
And there is my nice even first coat (above photo). I sprayed it about 5-6 times all over in even strokes. Took about 1 can - little less.
I forgot to mention - After I got it sprayed when it was upside down, I then  flipped it and hung it up on a nail (already in a bored in the garage) and then sprayed again.

Now onto the good stuff...
DIY STRIPES USING BLACK ELECTRIC TAPE 
So when I said that something beautiful came from something annoying (or some variation of that), what I meant was this...I was cleaning up all the electrical stuff my hubby had laying around and saw the black tape. For some reason my little brain started stirring and I thought BAM!! I need to put stripes on the bad boy. So I grabbed it and my newly painted chandelier (dry to the touch - see I can't wait even a day) and started just going with it. I didnt plan this out and I've never seen this done before. I ran it by my Mom, hubby, Sara and Shawnell via text really quick after I got one done and this is what they said:
Mom "Hmmm, I'll have to wait and see..."
Hubby "Wow! That's kinda crazy Babe. You know how much I love your stuff. Hmmm"
Sara "It's kind of fun!...I'd say go for it! Worst that happens, you have to take the tape off"
Shawnell "Funky!"
I took all of this to heart....and ran with it. Hope you like it Mom! Hubby is loving the finished product. We decided that it's an ode to our electrical mishap. I'll post more pictures after we get it up in the gazebo area.
YEP! Its going outside for the summer - Hanging above my outdoor dining table. Later it will be in my daughters room - over her reading nook.
The Picture I Texted...

 
AFTER 
The chandelier painted white & striped with electrical tape
 

 It reminds me of something out of the movie Beetle Juice! I'm thinking about painting just the cups (the flowery looking part under the light bulb) lime green or pink (pink for sure when it goes in Peyton's room).

I'd love to know if you've ever seen anything like this? What do you think?

Here's a sneak peak of our outdoor gazebo area. There will be 2 more curtains up over the backside polls. They are functional - They close to give us more shade if needed. You can't see it in this picture, but we have a bench on the back side of the dining table. I'll get you some close ups when it's done.

Thursday, June 16, 2011

Vintage Chrome Dining Table In, Farm Table Out (For Now)

So a few weeks ago we had a garage sale and my mother in law brought over a few of her old dining tables she had in her storage unit. One of the tables was a vintage chrome table from around the 1940's that she used to sit at as a child. She thinks its at least 60 years old. Long story sort of short, my friend Shawnell saw the table and after wiping the drool from her mouth - she convinced me to try it out inside our home before selling it. So...3 weeks later, we finally put it inside and I'm LOVING it. I have our old wood farm table outside under the gazebo, prepared to be in its own special setting with a chandelier hanging above it outside (more pictures of that space to come). It's pretty cool to eat at a table that your family member once sat at over dinner some 50 or 60 years ago! My daughter keeps licking her finger to wipe a small smudge off the table top, but other than that there are really no stains on it. The table is in amazing condition. Peyton just likes to clean the table like I clean her face ha!
THE LOWDOWN...
8 Plastic caps for the table legs (white color) = $4.00
Table = FREE
Total = $4.00

BEFORE

With the farm table - which is now in our outdoor living space...


AFTER
Here she is....in all her Chromness...
 And our little cutie, Evan, is the best accessory!
and..yes I know...the chandelier is not centered over the table. I took these pictures with my Iphone - thats how excited I was to get this on the blog - I didnt even center the table under the light - just snapped a photo and put them up for you all to see. No worries - the table is centered now. 


My hubby put new caps on the bottoms, waxed her up and oiled up the rims where the leafs slide in and out on. The easiest part - there were a few little spots on the table top that a soapy clothe didn't wipe up...but guess what! The magic eraser took them right off! Whoop Whoop. It really does look almost brand new.

I never envisioned this piece in the space so I'm glad I took my friends advice. Thanks Shawnell! I'm loving the chrome and the way it pulls the sparkle from my picture frames, chandelier and curtain rod.
What do you think?

Monday, June 13, 2011

Make a Magnetic Note Board Out of a Vintage Cookie Sheet

So a few days ago I stopped in to my favorite Spokane antique shop. The Vintage Rabbit on Monroe street is such an eclectic shop, with so many vendors to choose from who all offer different treasures. I also think they're priced fairly. What I love about this shop is that everything sold has to actually be antique - not just look antique. I guess I think it's cool that an item was actually used 50 years ago or more by someone and has a real story, rather than just painted to look like it was used 50 years ago. Don't get me wrong, I think new things that look old are rad, but I love the story and mystery that comes with a real antique item. So...What did I find??? I found the coolest little vintage cookie sheet and an old letter holder?- not even sure what it is - all for $4! The cookie sheet was $2 and the container was marked down to 50% off so it came to $2 also. I knew what I wanted to do with them as soon as I saw them.
Here are my little treasures....
Vintage Cookie Sheet 10'x14"
And the Letter Holder (already had the holes in it to hang it up)
 Look at the beautiful rust on that letter holder!
So I didn't want to drill holes in the cookie sheet, because down the road I may use it as a tray. I was tempted to put it on my kitchen counter, by my sink, with little herbs planted in clay pots on it. So to attach it to the cabinet I put double sided sticky pads on each of the corners and one in the middle (about 2 inch strips).
I screwed the tray onto the cabinet using 1/2" screws that I had and to make the heads of them blend in more I took a white sharpie and colored the silver heads in and then rubbed off some of the white. It matches beautifully! 
 The vintage magnetic cookie sheet and letter tray in their new home...


There are so many options with this project. You can use a cookie sheet to display your kids art work in the play room. This could be your recipe holder. How perfect would this be in an office! You can even write little love notes on the cookie sheet with a white dry erase pen. So many choices.What do you think?
Have you tackled a DIY project like this lately?


Sunday, June 12, 2011

Chalk Board Wall Art

The chalk board above my mantel has been updated and I'm really loving this drawing. I change it up a lot and most of the time it's a compilation of Peyton's drawings and mine. This time she said "Mommy, will you draw me a picture?" Aww isn't that just the sweetest thing ever? So I asked her, "What do you want me to draw you honey?" I already knew what she would say because it's her favorite thing to draw right now. She replied "A flower!"
So here it is. If you have an old piece of plywood or particle board laying around, this project is SO easy. We just primed the edges and one side of a 4x2 piece of particle board. You can purchase these pre-cut pieces from any hardware store. In this case, we bought ours from Lowes for a whole whopping $3.50. Once the piece is primed, you can paint it with whatever color chalk board paint you like.

Here's the lowdown...
Particle Board - $3.50
Primer - I already had, but you'll need less than a quart. 1 gallon of contractors primer =$8 at Lowes
Chalk Board Paint -  $8 - $14 for a quart. Walmart and Ace are generally cheaper.

 The primed edges are white - I've also framed them on the wall before - just make sure that the molding you choose to frame it with is as deep as the piece of wood - not hard to do when the plywood is only 1/4". You can make it so that the chalk board fits right into your frame on the wall so that you can still take your art off an on as you please. The options are endless.

This piece 4'x2' fits perfectly on our coffee table.
  I didn't plan it to fit like this - that was just one of those treasured moments that life sometimes brings my way. A moment where I went - I wonder if....and BAM it works! I've dubbed those moments as "Whoop Whoop" chapters in life. (Thanks to my friend Mel for the "title")

 Like the peak-a-boo of my gallery wall and mini mudroom makeover in this picture?
I just can't resist. It makes me smile.

These pictures were taken with my I-phone. You can just barely see the flower in this picture but I like how the gray chalk paint looks on the black board against my painted white brick fireplace and spray painted screen. Notice the new work bench by the fireplace? That was our $12 craigslist score for the kids. It's Peyton's little DIY table :). Gotta love the mismatched sofas too right!? One day they will match and magically turn into a brown leather sofa with chaise. In the mean time, I'm grateful for what we have...
I hope this little chalk board inspires you to get creative! What do you think?


P.S.  I've decided to paint this dalia flower image onto a canvas for Peyton's room. I'm going to go with a pinkish orange flower on a robin egg blue colored canvas...

Saturday, June 11, 2011

Giving an Old Dresser a New Image

Maybe you have an old dresser, or new dresser for the matter, that needs something? Sometimes all it takes are some new drawer pulls or hardware. Or maybe you just need to paint it? I had a vision for this craigslist dresser I found. It cost $20 and I had been looking for quite sometime for this piece. I wanted the top to work for a changing table, but I didnt want a huge dresser. I actually have another dresser I could have re purposed, but I wanted a smaller dresser for my son Evan's nursery. The concept I was going for was modern, eclectic and fun! I envisioned a tree and so it began....

BEFORE
 Lightly sand the dresser or item. Then tape your image on it. I like plan-o masking tape more than painters tape.I masked off where I wanted the wood grain to pop through and then taped up my tree. I didnt draw the tree on first or anything, I just eye balled it and if you don't like you just peel it off and start over. It's that easy!
 Always PRIME! Prime one coat. 0 VOC primer from Lowes is great. It dries very quick.
 You can sort of see the tape hiding under the paint on this drawer. Add your paint color now. Its best to set aside about 2 hours to do this project at once. The longer the tape sits on there under all this tape, the more likely your tape edge will get funky. You don't want to peel the paint off with the tape. Just peel the tape off as soon as you finish painting your last coat. Peel very slowly and have a knife on hand so that you can tap the paint on if its starts to peel. You will seal the dresser with a varathane when your done. You can buy a spray varathane or you can brush it on too. We bought the spray on kind and my hubby sprayed away. He said it went on very easy (I was pregnant with Evan so I couldn't spray paint). He applied 3 coats to protect my project. Thanks Hubby!

AFTER
 
This dresser is in Evan's room and I've been using it in there for about 9 months now. It's holding up great!